
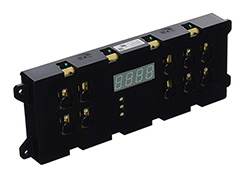
This is a new range oven electronic replacement part, Kenmore Oven Control Board 316207511. It fits Frigidaire, Gibson, Kelvinator, Kenmore, and Tappan oven brands. If your range oven is little to no heat when baking, then replacing the main control board could solve your appliance problem. Check your model and compare the lowest price here!
Kenmore Oven Control Board 316207511
- Product: Electronic Clock Control Board for Electric Range Oven
- Appliance Part: Range Oven Electronic Replacement Parts
- Part Number: 316207511
- Compatible Brands: Frigidaire Gibson Kelvinator Kenmore Tappan
- Compatible Part Numbers: 316557511 316207531 1036364 AP3561834 PS820139 EAP820139
Fits Kenmore Oven Models:
Note: Use Ctrl+F to find your model.
79092320301 79092320302 79092321301 79092321302 79092322301 79092322302 79092324301 79092324302 79092329301 79092329302 79092420301 79092420302 79092421301 79092421302 79092422301 79092422302 79092423301 79092429302 79092680301 79092680302 79092681301 79092681302 79092682301 79092682302 79092683301 79092683302 79092683303 79092684301 79092684302 79092689300 79092850301 79092850302 79092851301 79092851302 79092852301 79092852302 79092853301 79092853302 79092853303 79092854301 79092854302 79092859301 79092859302 79092882301 79092882302 79092884301 79092884302 79092889301 79092889302
79093553301 79093553302 79093553303 79093850301 79093850302 79093850303 79093851301 79093851302 79093851303 79093852301 79093852302 79093852303 79093853301 79093853302 79093853303 79093854301 79093854302 79093854303 79093859301 79093859302 79093859303
79094320300 79094320301 79094320302 79094321300 79094321301 79094321302 79094321303 79094322300 79094322301 79094322302 79094322303 79094324300 79094324301 79094324302 79094329300 79094329301 79094329302 79094420300 79094420301 79094421300 79094421301 79094422300 79094422301 79094423300 79094423301 79094424300 79094424301 79094429300 79094429301 79094680300 79094680301 79094681300 79094681301 79094682300 79094682301 79094683300 79094683301 79094683302 79094684300 79094684301 79094689300 79094850300 79094850301 79094851300 79094851301 79094852300 79094852301 79094853300 79094853301 79094854300 79094854301 79094859300 79094859301
79095320301 79095320302 79095320303 79095321301 79095321302 79095321303 79095321304 79095322301 79095322302 79095322303 79095322304 79095324301 79095324302 79095324303 79095329300 79095329301 79095329302 79095329303 79095420302 79095420303 79095421301 79095421302 79095421303 79095422301 79095422302 79095422303 79095423301 79095423302 79095423303 79095424301 79095424302 79095424303 79095429301 79095429302 79095429303
79095680301 79095680302 79095680303 79095681301 79095681302 79095681303 79095682301 79095682302 79095682303 79095683301 79095683302 79095683303 79095684301 79095684302 79095684303 79095689301 79095689302 79095689303 79095882301 79095882302 79095882303 79095884301 79095884302 79095884303 79095889301 79095889302 79095889303
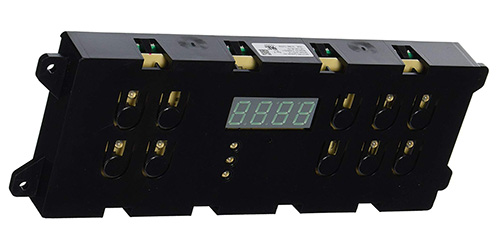
How To Replace Oven Control Board
Watch this video, created by PartSelect. Steve shows you simple and easy step-by-step instructions on how to replace the oven electronic control board.
Tools Needed:
- ¼ inch nut driver
- Needle nose pliers
Step-By-Step Instructions:
- Starting with disconnect power.
- Pull the range far enough forward that we can access the back.
- Either turn the power off at the breaker or fuse panel or unplug it and then, pull the range forward so that we can get to the back.
- Next, remove six quarter-inch hex head screws that secure this upper back panel to the cabinet.
- Then, just let that panel drop down and remove it. Next, we have four more quarter-inch hex head screws that hold that control board assembly to the console, so we’ll remove those.
- Then, we can lift that assembly clear of the range. We can then disconnect the power harness connectors that are attached to the control board. This large one, you usually just rock it back and forth to remove it.
- The individual wires that are attached on the end of that control, you’ll need to take note of the color codes. Either take a photograph them with your phone or just mark them down and then, remove those.
- If you find some of those terminals a little tight, just take the needle nose pliers and pry them off. We’ll also inspect those wire terminals carefully to make sure that there are no signs of any arcing or corrosion. If so, we would need to replace that terminal.
- Now, with the oven control board removed, you’ll note that the new control board does not come with the overlay on it.
- Now, we can either remove the old overlay from the board assembly and attach it to the new one or you can remove the control boards themselves from the housing and swap those.
- Typically, these overlays will come off quite easily. With a thin putty knife, we’ll just go into one edge and very carefully slide that through the length of it, being very careful not to crease it.
- Now, it should just lift off. Typically, there’s adhesive left on that overlay that we will not have to add any new.
- Now, if you feel that the overlay does not have enough adhesive on it, you can take and run a strip of double-faced tape around the perimeter of the housing for your new control and it only needs to be about a quarter of an inch wide.
- We’ll carefully position that overlay on the new control and with it centered, just press down on the edges and it should adhere.
- You can now reconnect the wires to the terminals. Again, make sure that they are nice and tight. The multi-pin connector, make sure it’s firmly pressed onto the new control and then, rotate the assembly into position and then, reattach with the quarter-inch screws.
- We just make sure we tucked the wire harness safely out of the way and then, we can reinstall that upper back panel.
- Now, when installing this back panel, we’ll keep all three of those tabs at the top in behind the lip of the console. We’ll start by just inserting that top center screw.
- Just loosely install that so that we can move the panel round enough to line up all the rest of the screw holes and then, go ahead and put them in.
- Now, with all the screws tightened up, we can push the range into position and reconnect the power.
- Once we reconnect the power, our repair is complete.
Compare Lowest Price
Read more product details of Oven Control Board 316207511 for Kenmore. View shipping information, warranty & return policy, and compare the lowest price on eBay here!
More Information
As well as Kenmore Oven Control Board 316207511, find more parts of Kenmore, control boards for Kenmore, range oven control boards, and Kenmore oven electronic replacement parts. Please contact us if you need help.
You might be interested:
Kenmore 11027042603 Washer Control Board
Range FLF337ECS Oven Circuit Control Board
FGF326ASB Oven Electronic Control Board
Genuine Whirlpool RBD275PDQ15 Oven Control Board
Kenmore Refrigerator Main Control Board 12920721
Stove FFGF3047LSC Oven Control Board
Kenmore 11095088400 Dryer Control Board Assembly
Range FGFB337GCE Oven Electronic Control Board
