Struggling with a Refrigerator Leaking Water? Our comprehensive troubleshooting guide provides step-by-step solutions to identify and fix the issue.
Don’t let leaks ruin your appliance—empower yourself with expert guidance. Dive into our guide now to save your refrigerator and prevent further damage.
Resolve the problem efficiently and get back to a leak-free appliance with our invaluable insights. Your refrigerator deserves the best care—start troubleshooting today!
Refrigerator Leaking Water Troubleshooting Guide
If you’ve ever encountered the frustrating issue of a refrigerator leaking water, you’re not alone. This common problem can stem from various issues within your appliance.
In this comprehensive troubleshooting guide, we’ll explore the possible damaged parts and provide you with a step-by-step process to help you resolve the “refrigerator leaking water” problem effectively.
Identifying the Refrigerator Leaking Water Issue
a. Defrost Drain Inspection: One of the primary culprits behind a refrigerator leaking water is a clogged defrost drain. Begin by locating the drain at the back of your fridge. Carefully inspect it for any debris or ice buildup. If you notice blockages, use a solution of hot water and mild soap to clear the drain. Tools like a turkey baster or a pipe cleaner can assist in this process.
b. Water Line Examination: The water line connected to your refrigerator’s dispenser or ice maker is a critical component. Inspect the entire length of the water line for cracks or leaks. Any compromise in the line could result in water pooling in and around the refrigerator. If you find issues, it’s essential to replace the water line promptly.
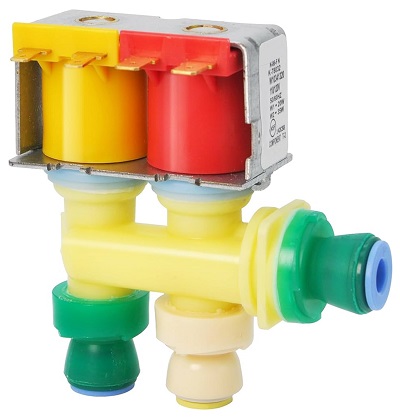
c. Water Inlet Valve Check: A malfunctioning water inlet valve is a common source of water leakage. Inspect the valve for visible damage or irregularities. If any issues are detected, follow the manufacturer’s guidelines to replace the water inlet valve. Seeking professional assistance may be necessary for this task.
d. Door Gasket Evaluation: A worn or damaged door gasket can lead to warm air entering the fridge, causing condensation and eventual water leakage. Check the door gasket for tears, gaps, or signs of wear. If you find any issues, replace the gasket with a compatible part according to the manufacturer’s instructions.
e. Drain Pan Inspection: The drain pan located beneath your refrigerator may become cracked or misaligned over time. Examine the pan for any visible damage. If the pan is compromised, reposition it correctly or acquire a replacement. Ensuring the proper functioning of the drain pan is crucial in preventing water leaks.
Possible Damaged Parts
a. Defective Defrost Drain: The defrost drain is a critical component in managing excess water within the refrigerator. If it becomes defective or clogged, it can lead to water leaks. Regularly check for signs of blockages, and if identified, address them promptly to prevent further issues.
b. Damaged Water Line: The water line connecting to your refrigerator’s dispenser or ice maker is susceptible to wear and tear. Any cracks or leaks in the water line can result in water pooling around the appliance. Regular inspections and timely replacement of a damaged water line are essential to prevent water leakage.
c. Faulty Water Inlet Valve: The water inlet valve controls the flow of water into the refrigerator. A faulty valve can lead to leaks. If you observe any visible damage or irregularities, replacing the water inlet valve is crucial. Refer to the manufacturer’s guidelines for a proper replacement process.
d. Worn Door Gasket: The door gasket forms a seal around the refrigerator door, preventing warm air from entering. Over time, wear and tear may compromise this seal, leading to condensation and water leakage. If you notice tears, gaps, or signs of wear on the door gasket, replacement is necessary to maintain an effective seal.
e. Misaligned or Cracked Drain Pan: The drain pan beneath the refrigerator is designed to collect excess water. If it is misaligned or cracked, water can escape, causing leaks. Regularly inspect the drain pan for any damage and promptly reposition or replace it as needed to ensure proper water containment.
Shop the Best Deals on Refrigerator Parts on eBay
“Revitalize your refrigerator with top-quality parts! Shop the Best Deals on Refrigerator Parts on eBay today. Enjoy free shipping, a 30-day return policy, and our 100% customer satisfaction guarantee. Don’t miss out!

You Might Need These Refrigerator Parts
Step-by-Step Refrigerator Troubleshooting Guide:
a. Unplug the Refrigerator: Begin by ensuring your safety. Disconnect the refrigerator from the power source by unplugging it from the electrical outlet. This precautionary step is essential before delving into any troubleshooting activities.
b. Clearing the Defrost Drain: If the defrost drain is identified as the issue, clear it of any debris or ice buildup. Use a solution of hot water and mild soap, employing tools like a turkey baster or pipe cleaner to assist in the process. Ensure the drain is completely unobstructed.
c. Inspecting and Replacing the Water Line: Carefully inspect the entire water line for cracks or leaks. If any issues are found, follow the manufacturer’s guidelines to replace the water line. This step is crucial in preventing water from pooling around the refrigerator.
d. Replacing the Water Inlet Valve: If the water inlet valve is deemed faulty, replace it following the manufacturer’s instructions. Ensure the new valve is compatible with your refrigerator model. Seek professional assistance if you are unsure about the replacement process.
e. Door Gasket Replacement: Examine the door gasket for tears, gaps, or signs of wear. If any issues are identified, replace the gasket with a compatible part according to the manufacturer’s guidelines. A properly functioning door gasket is vital to preventing condensation and water leakage.
f. Adjusting or Replacing the Drain Pan: Confirm that the drain pan is correctly positioned beneath the refrigerator. If it is misaligned or cracked, reposition it or acquire a replacement. The drain pan plays a crucial role in containing excess water, preventing leaks.
g. Final Checks and Safety Precautions: After troubleshooting and making necessary replacements, perform a final check to ensure all components are in proper working order. Plug the refrigerator back into the power source and monitor for any signs of leakage. Prioritize safety throughout the troubleshooting process and seek professional help if needed.
Note: Explore additional refrigerator troubleshooting guides here.
Quick Fix for Refrigerator Water Leaks
“Is your refrigerator leaking water? Discover an easy solution in our latest video! Learn a quick fix to tackle the issue and save your appliance. Watch now to troubleshoot the problem effortlessly. Don’t let leaks ruin your fridge—empower yourself with our simple and effective solution. Hit play and say goodbye to refrigerator leaks today!”
More Refrigerator Troubleshooting Guides
Conclusion
By following these step-by-step troubleshooting tips, you can identify and address the issues causing your refrigerator to leak water. Remember to always prioritize safety, and if you encounter challenges or are unsure about any part replacement, consult a professional technician for assistance.

